Welcome young Fox. Tunic has been added to May’s PS Plus free games. Tunic is an action adventure game, available on all current consoles. When you first play, you are given very little instruction as to what is going on or what you have to do.
We thought now would be a good time to give you some guidance so that you may fulfil your prophecy.
Accessibility
First off there are a lot of accessibility options that players can utilize. If at any point you are finding the game too difficult, or would like to keep it fun for younger gamers, you could, for example, turn off the stamina meter or make yourself invincible. But I didn’t tell you that 😉
The Controls
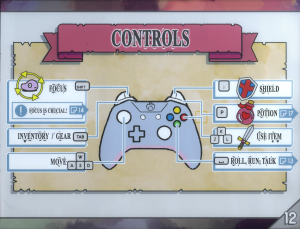
Despite the above image being for PC / Xbox, this guide is predominantly written for the Playstation version, but thankfully the game screen has prompts to help remind you if you forget (or remap the controller).
- The left analogue stick allows you to move.
- X has a multitude of functions, firstly it allows you to dodge.
- Holding X whilst moving allows you to sprint (but weirdly doesn’t affect stamina).
- Holding X whilst stationary for 3 seconds allows you to enter a meditative trance (useful for unlocking the columns and activating the yellow warp points).
- Square, Triangle and O can be used to assign any of your collected items.
- R1 causes you to consume a potion.
- R2 will bring up your shield, with double tapping allowing you to deflect some attacks.
- L2 Locks onto nearby enemies, showing their health or slightly changes the camera angle until you release it.
- L1 Brings up your item menu.
- The control pad is used for secret treasure chests and areas.
Can I Get A Menu Please?
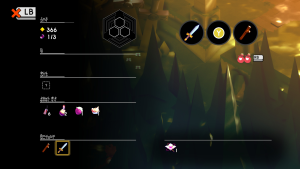
The first thing you will notice is that the screen is split into 5 underlined sections and a box, with a further black box in the bottom right corner.
- The 1st underlined section is for currency (diamond shape), and bottle pieces (?/3). To the right of this is the collected seals (the big hexagons split into the pyramid of hexagons)
- The 2nd underlined section is for useful key items that can’t be equipped, such as a torch.
- The 3rd underlined section is for ability modifiers, such as changing potion types or increasing speed.
- The 4th underlined section is for items that you can equip and use, such as bombs.
- The 5th underlined section is for your weapons.
- The box on the right is for upgrading your character.
Bars
In the bottom left corner are bars. From left to right we have:
- Purple (left) indicates your health.
- Green (middle – right when starting the game) is your stamina bar.
- Blue (right – unlocked later) Magic attacks.
Enemies
- Early game enemies retreat slightly and will glow before they attack.
- Middle game enemies don’t glow but still slightly retreat before they attack.
- Late game enemies will slightly retreat and also have a lovely ability that also reduces your max health until you reach a save point. These enemies are usually covered by purple pinky sludge in some shape or form.
BE WARNED: on defeat some enemies will self-destruct. Most enemies drop currency, but some drop health as well or instead of.
Combat tips
You can hold the button prompt (L2) to target a specific enemy and see their health. If you are overwhelmed by enemies, you can tactically retreat to see if they give you a better opening. Personally until you are more confident, I would recommend attacking once before dodging / moving and attacking again. Do not trap yourself in a corner, the enemies love that. If you wish, you can run past a lot of enemies; however, most will try and follow you, so it may be better to stay and fight if you can, or activate a save point if you can. Some enemies require a mastery of the shield deflect to defeat. Going through grass / trees or fighting near some enemies will alert others who will join the fight, so be warned.
Collecting Pages
Technically you should be collecting pages (for the true ending) as you go, which will eventually tell you everything within this guide, albeit not in a logical order (i.e. you could find the page about one of the upcoming bosses before you learn to sprint). However, it is easy to miss them or collect a page that would of been useful to know 2 hours ago. As you collect pages, occasionally new info gets written in them, so its always handy to keep checking back when gaining new pages. Also it’s worth noting that to open one of the locked doors you need most of the pages, as there is a secret code on each of the pages that you need to input.
Game Over!
If you do run out of health, you will die. If it is early in the game, You will enter the afterlife, and must head left until you meet the giant fox who revives you. She will bring you back to your last save point (don’t worry, I will explain those in a sec). You will also lose some of your currency and a ghost of you will inhabit the location at which you died. If you touch that ghost, you will regain some currency, and will send out a shockwave damaging nearby enemies. However, if you don’t reach that ghost before dying, that ghost is lost and a new ghost will appear where you last died.
Save Points
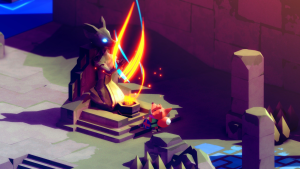
There are numerous fox statues with a fire pit below located around the map. These are the save points. Your last activated one will be where you are revived if you die. The main function is to save the game, but by activating it, you will reset all enemies on the map, so clearing out an area and returning may not be a good idea unless you are using an area to increase the amount of currency you have (currency farming). However, there is another key function of the Save Point
Chests
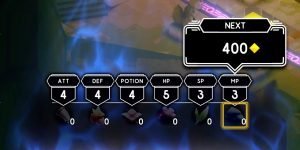
Within chests are numerous upgrades, which will increase your abilities.
- The Fox tooth will upgrade your attack
- The small Fox statue will upgrade your defence
- The crocus will upgrade the effectiveness of your potions
- The pink flowers will increase your health bar
- The leaves will upgrade your stamina bar
- The mushrooms will upgrade your magic bar.
To activate them simply stand in front of the statue, open your inventory and select the appropriate item. Currency farming to get enough coins is extremely recommended as it means you will have enough currency to afford the upgrade, which may help you get through the area where you are stuck. It is important to note that some of these upgrades require further abilities to find, so if you have unlocked new abilities, it may be worth retracing your steps.
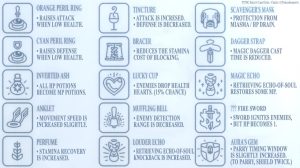
Also within these chests are ability modifiers and coins. the abilities equipped depend on your playstyle. Placing the coins in the wishing wells will incrementally increase the number of abilities you can equip at a time.
Shh!
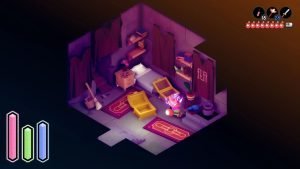
Also hidden though the world are secret chests, areas and fairies, which are either obvious (grey /golden doors) or are subtly hidden (like above on the curtain) or are referred to in the manual. These require using the d-pad to enter a button combination that follows a set path. In the above example, the solution is Up, Up, Right, Down, Down, Right, Up, Up, Right, Down, Down, Down (start from the circle and count every horizontal dash as a new input).
Trophies You Can Miss
Some things are only discoverable by finding pages from the instruction manual and using them to work things out.
There are 4 trophies that are easily missed and will require a second playthrough to obtain them. They are:
What just happened? – Was resurrected before ringing the 2nd bell.
Game Over – Didn’t complete the guide (we’d recommend NOT completing the guide as you won’t be able to get the other ending which kinda explains a few things if you complete the guide first).
Too Cute To Smash – Have all 10 moneybanks (hats that looks like Tunic’s head) at once. DO NOT USE THEM!
Bring it to the wrong fight – Found a certain weapon before getting a sword. To do this I’d recommend a second ‘playthrough’ but switching on the invincibility, as you would know where to go and what to do by then to get the gun first.
WHERE TO GO AND IN WHAT ORDER
Getting to Grips / Chapter 1
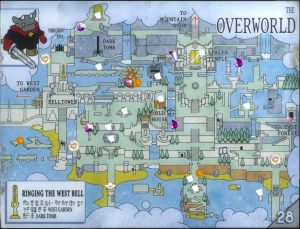
Mailbox house (just up from the beach). East Forest (through the locked door). East Belltower. Lower Forest (SPIDERS) … (fall down the hole in the Belltower). Hero’s Grave (follow the signs). Guard Tower 2 (backtrack to the last save point and climb the ladder). Guard Tower 1. East Belltower (and hit that bell).Old House (backtrack until you are in the centre of the map, you’ll find an enemy infested village, use the the key on the door and complete that area).
The Detour (part 1) – The way I’d recommend / Chapter 2
Ruined Atoll (south of the enemy with the shield at the bottom of the village). The Frog’s Domain (top right of area).
The Intended Way / Chapter 3
The Well (just north of the town, the massive hole just north of the windmil). Dark Tomb (north of where you exit the well, or if you’ve been explored the area first, the massive cave by the waterfall). West Belltower, (follow the path). West Garden (1st proper boss). West Belltower (hit that bell).
The 3 seals / Chapter 4
Ruined Atoll (south of the enemy with the shield at the bottom of the village). The Frogs Domain (if not already done – see Chapter 2). The Great Library (activate the structure in the middle on Ruined Atoll to reach. Boss Fight). Sealed Temple (north of the first save point).The East Forrest (follow the path round to the right of the sealed vault). Beneath The Earth (SPIDERS .. A FAIR FEW OF THEM… Top left of area). Church (after making it through Spider central). Eastern Vault (at the back or the Church, by the main entrance). Sealed Temple (Boss Fight). West Belltower (backtrack to the gate which you could not get past … use the whip to get through). Fight your way through The Forbidden Pass, The Quarry and The Monastary (Note: this is where the purple/ pink sludge health draining enemies are found). head down to the Ziggurat (SPIDERS … this is also where the game goes a bit weird). Hidden Vault. Sealed Temple (3rd boss fight).
Closing In / Chapter 5
Backtrack to the yellow teleport square. Activate it and go to central square. Fight the giant fox (you will lose). The Swamp (South of the Lower Forrest). Cathedral (complete the boss rush). Visit the 6 hero graves (use the teleporters and your new ability). Go to the old house (The house in the village .. now occupied by ghosts) and pray / enter the bed.
The Choice / Chapter 6
You can either carry on exploring (recommended unless you are confident of your abilities and current levels) and finding the missing pages (not recommended), or you can go fight the boss again for ending one (recommended). The giant fox is multi-stage and gets insanely harder as it goes on. If you haven’t already you may wish to switch invincibility on. Defeat the fox and watch the ‘bad’ ending. You’ll be respawned at the start just before the fight. Now is the best time to get all the pages, open all the chests, find all those secrets and free those fairies, get those possible trophies you may not have achieved yet. After completing the manual go to the boss and watch the 2nd ‘good’ ending.
This concludes Tunic, we hope you’ve enjoyed it. Let us know in the comments below what you think of Tunic.
Please note that some links in this article are affiliate links. If you found the coverage helpful and decide to pick up the game, or anything else for your collection, through one of those links, we may earn a commission at no extra cost to you. We use this approach instead of filling Spawning Point with intrusive display ads, and rely on this support to keep the site online and fund future reviews, guides, comparisons and other in-depth gaming coverage. Thank you for supporting the site.
